FAQ'S
How to Change Font Style ?
Step 1:
Go To _fonts.scss (assets/scss/custom/fonts/_fonts.scss )
if you want to change another font-family Go to the site Google Fonts And Slect One font Family and import In to style.css file
How to Select font Family
Example:

Step 2:
And paste Your Selected font-family in Style.scss i.e (root:-assets/scss/style.scss)
Example:
@import url("https://fonts.googleapis.com/css?family=Roboto:300,400,500,700,900");
Step 3:
And add the Your Selected font-family in _custom-styles.scss(assets/scss/custom/_custom-styles.scss)
Example:
	body {
		font-family: "Roboto", sans-serif;
	}
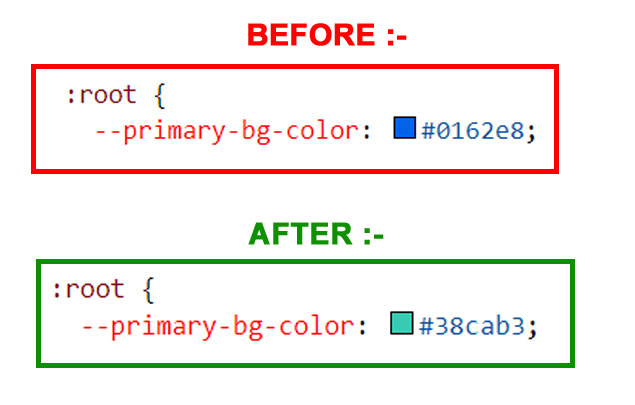
How to Change Primary Color ?
Step 1:
Go To _custom-styles.scss (assets/scss/custom/_custom-styles.scss )
You will find --primary-bg-color:#0162e8; , where you can
simply change color code to change primary color
How to Change Primary Color
Example:
Simply you can also change color for
primary-bg-hover:#025cd8; &
--primary-bg-border:#0162e8; , where you can simply change
color code to change them
How to Change Logo ?
Go To "assets/img/brand" folder and replace your logo with Previous Logos within in image size. note: Please don't increase logo sizes. Replace your logo within given image size. otherwise the logo will not fit in particular place it disturbs the template design.
How to Enable RTL & LTR Version?
Please follow the below steps to enable RTL Version
To enable RTL Version you have to open switcherdata.jsx
(/src/common/switcherdata.jsx)
file
and write comments for rtl as shown in below
											/******* RTL VERSION adding class *******/

   document.querySelector(".app").classList.add("rtl");
// document.querySelector("html[lang=en]").setAttribute("dir", "rtl");
// document.querySelector(".app").classList.remove("ltr");
Please follow the below steps to remove LTR Version
To remove LTR Version you have to open switcherdata.jsx
(/src/common/switcherdata.jsx)
file
and remove comments for ltr as shown in below
											/******* LTR VERSION *******/

   document.querySelector(".app").classList.add("ltr");
// document.querySelector("html[lang=en]").setAttribute("dir", "ltr");
// document.querySelector(".app").classList.remove("rtl");
How to Enable DarkTheme
Please follow the below steps to enable dark Version
To enable dark Version you have to open switcherdata.jsx
(/src/common/switcherdata.jsx)
file
and write comments for Darktheme as shown in below
											/******* Dark mode adding Class *******/

document.querySelector(".body").classList.add("dark-theme");
Please follow the below steps to remove dark Version
To remove dark Version you have to open switcherdata.jsx
(/src/common/switcherdata.jsx)
file
and remove comments for Darktheme as shown in below
											/******* Dark mode remove Class *******/

document.querySelector(".body").classList.remove("transparent-theme");
document.querySelector(".body").classList.remove("light-theme");
document.querySelector(".body").classList.remove("light-header");
document.querySelector(".body").classList.remove("color-header");
document.querySelector(".body").classList.remove("gradient-header");
document.querySelector(".body").classList.remove("light-menu");
document.querySelector(".body").classList.remove("color-menu");
document.querySelector(".body").classList.remove("gradient-menu");
How to Enable Color Header
Please follow the below steps to enable Color header
To enable Color header you have to open switcherdata.jsx
(/src/common/switcherdata.jsx)
file
and write comments for ColorHeader as shown in below
											/******* Color header adding Class *******/

document.querySelector(".app").classList.add("color-header");
Please follow the below steps to remove Color header
To remove Color header you have to open switcherdata.jsx
(/src/common/switcherdata.jsx)
file
and remove comments for ColorHeader as shown in below
											/******* Color header remove Class *******/
document.querySelector(".app").classList.remove("gradient-header");
document.querySelector(".app").classList.remove("dark-header");
document.querySelector(".app").classList.remove("light-header");
How to Enable Dark Header
Please follow the below steps to enable Dark header
To enable Dark header you have to open switcherdata.jsx
(/src/common/switcherdata.jsx)
file
and write comments for DarkHeader as shown in below
											/******* Dark header adding Class *******/

document.querySelector(".app").classList.add("dark-header");
Please follow the below steps to remove Dark header
To remove Dark header you have to open switcherdata.jsx
(/src/common/switcherdata.jsx)
file
and remove comments for DarkHeader as shown in below
											/******* Dark header remove Class *******/
document.querySelector(".app").classList.remove("color-header");
document.querySelector(".app").classList.remove("gradient-header");
document.querySelector(".app").classList.remove("light-header");
How to Enable Light Header
Please follow the below steps to enable Light header
To enable Light header you have to open switcherdata.jsx
(/src/common/switcherdata.jsx)
file
and write comments for LightHeader as shown in below
											/******* Light header adding Class *******/

document.querySelector(".app").classList.add("light-header");
Please follow the below steps to remove Light header
To remove Light header you have to open switcherdata.jsx
(/src/common/switcherdata.jsx)
file
and remove comments for LightHeader as shown in below
											/******* Light header remove Class *******/
document.querySelector(".app")..classList.remove("color-header");
document.querySelector(".app")..classList.remove("gradient-header");
document.querySelector(".app")..classList.remove("dark-header");
How to Enable Gradient Header
Please follow the below steps to enable Gradient header
To enable Gradient header you have to open switcherdata.jsx
(/src/common/switcherdata.jsx)
file
and write comments for GradientHeader as shown in below
											/******* Gradient header adding Class *******/

document.querySelector(".app").classList.add("gradient-header");
Please follow the below steps to remove Gradient header
To remove Gradient header you have to open switcherdata.jsx
(/src/common/switcherdata.jsx)
file
and remove comments for GradientHeader as shown in below
											/******* Gradient header remove Class *******/
document.querySelector(".app")..classList.remove("color-header");
document.querySelector(".app")..classList.remove("light-header");
document.querySelector(".app")..classList.remove("dark-header");
How to Enable Light Menu
Please follow the below steps to enable Light Menu
To enable Light Menu you have to open switcherdata.jsx
(/src/common/switcherdata.jsx)
file
and write comments for LightMenu as shown in below
											/******* Light Menu adding Class *******/

document.querySelector(".app").classList.add("light-menu");
Please follow the below steps to remove Light Menu
To remove Light Menu you have to open switcherdata.jsx
(/src/common/switcherdata.jsx)
file
and remove comments for LightMenu as shown in below
											/******* Light Menu remove Class *******/
document.querySelector(".app")..classList.remove("color-menu");
document.querySelector(".app")..classList.remove("gradient-menu");
document.querySelector(".app")..classList.remove("dark-menu");
How to Enable Color Menu
Please follow the below steps to enable Color Menu
To enable Color Menu you have to open switcherdata.jsx
(/src/common/switcherdata.jsx)
file
and write comments for ColorMenu as shown in below
											/******* Color Menu adding Class *******/

document.querySelector(".app").classList.add("color-menu");
Please follow the below steps to remove Color Menu
To remove Color Menu you have to open switcherdata.jsx
(/src/common/switcherdata.jsx)
file
and remove comments for ColorMenu as shown in below
											/******* Color Menu remove Class *******/
document.querySelector(".app")..classList.remove("light-menu");
document.querySelector(".app")..classList.remove("gradient-menu");
document.querySelector(".app")..classList.remove("dark-menu");
How to Enable Dark Menu
Please follow the below steps to enable Dark Menu
To enable Dark Menu you have to open switcherdata.jsx
(/src/common/switcherdata.jsx)
file
and write comments for DarkMenu as shown in below
											/******* Dark Menu adding Class *******/

document.querySelector(".app").classList.add("dark-menu");
Please follow the below steps to remove Dark Menu
To remove Dark Menu you have to open switcherdata.jsx
(/src/common/switcherdata.jsx)
file
and remove comments for DarkMenu as shown in below
											/******* Dark Menu remove Class *******/
document.querySelector(".app")..classList.remove("light-menu");
document.querySelector(".app")..classList.remove("gradient-menu");
document.querySelector(".app")..classList.remove("color-menu");
How to Enable Gradient Menu
Please follow the below steps to enable Gradient Menu
To enable Gradient Menu you have to open switcherdata.jsx
(/src/common/switcherdata.jsx)
file
and write comments for GradientMenu as shown in below
											/******* Gradient Menu adding Class *******/

document.querySelector(".app").classList.add("gradient-menu");
Please follow the below steps to remove Gradient Menu
To remove Gradient Menu you have to open switcherdata.jsx
(/src/common/switcherdata.jsx)
file
and remove comments for GradientMenu as shown in below
											/******* Gradient Menu remove Class *******/
document.querySelector(".app").classList.remove("light-menu");
document.querySelector(".app").classList.remove("dark-menu");
document.querySelector(".app").classList.remove("color-menu");
How to Enable Boxed-Layout
Please follow the below steps to enable Boxed-Layout
To enable Boxed-Layout you have to open switcherdata.jsx
(/src/common/switcherdata.jsx)
file
and write comments for Boxed as shown in below
											/******* Boxed-Layout adding Class *******/

document.querySelector(".app").classList.add("layout-boxed");
Please follow the below steps to remove Boxed-Layout
To remove Boxed-Layout you have to open switcherdata.jsx
(/src/common/switcherdata.jsx)
file
and remove comments for Boxed as shown in below
											/******* Boxed-Layout remove Class *******/
document.querySelector(".app").classList.remove("layout-fullwidth");
How to Enable Scrollable-Layout
Please follow the below steps to enable Scrollable-Layout
To enable Scrollable-Layout you have to open
switcherdata.jsx
(/src/common/switcherdata.jsx)
file
and write comments for Scrollable as shown in below
											/******* Scrollable-Layout adding Class *******/

document.querySelector(".app").classList.add("scrollable-layout");
Please follow the below steps to remove Scrollable-Layout
To remove Scrollable-Layout you have to open
switcherdata.jsx
(/src/common/switcherdata.jsx)
file
and remove comments for Scrollable as shown in below
											/******* Scrollable-Layout remove Class *******/
document.querySelector(".app").classList.remove("fixed-layout");
How to Enable Body-Style
Please follow the below steps to enable Body-Style
To enable Body-Style you have to open switcherdata.jsx
(/src/common/switcherdata.jsx)
file
and write comments for BodyStyle1 as shown in below
											/******* Body-Style adding Class *******/

document.querySelector(".app").classList.add("body-style1");
Please follow the below steps to remove Body-Style
To remove Body-Style you have to open switcherdata.jsx
(/src/common/switcherdata.jsx)
file
and remove comments for BodyStyle1 as shown in below
											/******* Body-Style remove Class *******/
document.querySelector(".app").classList.remove("DefaultBody");
How to Enable Left-side closed menu
Please follow the below steps to enable Left-side closed menu
To enable Left-side closed menu you have to open header.jsx
(src/layouts/layoutcomponents/header.jsx)
file
and write comments for leftsidemenu as shown in below
											/******* Left-side closed menu *******/

document.querySelector(".app")?.classList.toggle("sidenav-toggled");
How to Enable horizontal layout
Please follow the below steps to enable horizontal layout
To enable horizontal layout you have to open
switcherdata.jsx
(/src/common/switcherdata.jsx)
file
and write comments for horizontalclickmenu as shown in
below
											/******* horizontal layout *******/

document.querySelector(".app").classList.add("horizontal");
document.querySelector(".app").classList.remove("sidenav-toggled");
document.querySelector(".app").classList.remove("horizontal-hover");
How to Enable horizontal-hover layout
Please follow the below steps to enable horizontal-hover
To enable horizontal-hover you have to open
switcherdata.jsx
(/src/common/switcherdata.jsx)
file
and write comments for Horizontalhovermenu as shown in
below
											/******* Body-Style adding Class *******/

document.querySelector(".app").classList.add("horizontal");
document.querySelector(".app").classList.add("horizontal-hover");
document.querySelector(".app").classList.remove("sidebar-mini");
document.querySelector(".app").classList.remove("sidenav-toggled");
How to remove the switcher
Please follow the below steps to remove Switcher
Step: 1
To remove Switcher you have to open
header.jsx
(src/layouts/layoutcomponents/header.jsx)
file
and there itself you can remove or comments for
switcher code as shown in
below
{/* Switcher Open */}
<Step: 2
After remove Switcher codein the same page you have to
remove or comments for switcherMenu function code as shown
in
below
											// SwitcherMenu

const SwitcherIcon = () => {
document.querySelector(".demo_changer").classList.toggle("active");
document.querySelector(".demo_changer").style.right = "0px";
}
Step: 3
At last you have to open App.jsx
(src/layouts/App.jsx) and
remove or comments the
Switcher tag as well as the comments the imports also as
shown in
below
import Switcher from '../layouts/layoutcomponents/switcher';
<How to remove the Loader
Please follow the below steps to remove Loader
To remove Loader you have to open main.jsx
(src/main.jsx)
file and remove or comments for Loader code as shown in
below
"const App = lazy(() =>"
<if you want to change a custom loader image please follow the below steps below
Step: 1
for changing a custom image you have to open loader.jsx
(src/layouts/layoutcomponents/loader.jsx)
file and remove the existing image path and you can put the
new image as shown in below
import LoaderImage from '../../../assets/img/loader.svg';
<Why we are using the vite.config.js file and .env file ?
Vite allows you to have more control over your project's configuration by extending the default configuration with vite.config.js or vite.config.ts. These are located in the project's base root directory.
the file vite.config.js is the stands for configuration management tools. and we mostly use for to configure the root routing path
for example in Valex admin template we have given the base pathvalex/preview/
Note: While you are create your own project need to change the base path accordingly.
How to change Horizontal Menu as Default
Please follow the below to steps change Horizontal as default
Step:1
Open your index.html (path:src\index.html)file and
add the following code
mentioned below. This will sets the layout style to horizontal for the
entire document.
<Step:2
Open your App.jsx (path:src/layouts/App.jsx)file and
add the following code
mentioned below. This will sets the layout style to horizontal for the
entire document.
<Step: 3
Open your
sidebar.jsx(path:src\layouts\layoutcomponents\sidebar.jsx)
file and add the following code mentioned below.
<Step: 3
Open your
Header.jsx(path:src\layouts\layoutcomponents\header.jsx)
file and add the following code mentioned below.
<Step: 4
Open your
switcher.jsx(path:src\layouts\layoutcomponents\switcher.jsx)
file and add the following code mentioned below.
<Note: make sure to remove defaultChecked from the vertical input.
Step: 5
Open your
reducer.jsx(path:\src\common\redux\reducer.jsx)
file and add the following code mentioned below.
		 let vertail:any = document.querySelector("#myonoffswitch35") as HTMLInputElement
		vertail.checked = true;  //Vertail //change the id #myonoffswitch34 to #myonoffswitch35
How to change Rtl Version as Default
Please follow the below to steps change Rtl version as default
Step: 1
Open your App.jsx (path:src\layouts\App.jsx)file and
add the following code mentioned below. This will sets the layout style
to rtl for the entire document.
 document.querySelector("body")?.classList.add("rtl",  "bg-primary-transparent", "error-page1", "main-body", "error-2",);
  //change the ltr class to rtl
Step: 2
Open your
switcherdata.jsx(path:src\layouts\layoutcomponents\switcherdata.jsx)
file and add the following code mentioned below.
<Note: make sure to remove defaultChecked from the ltr input.