Sparic - React Javascript Admin Dashboard Template
FAQS
General Style
How to Change Font Style ?
Step 1:
Go To style.scss (src/assets/scss/styles.scss )
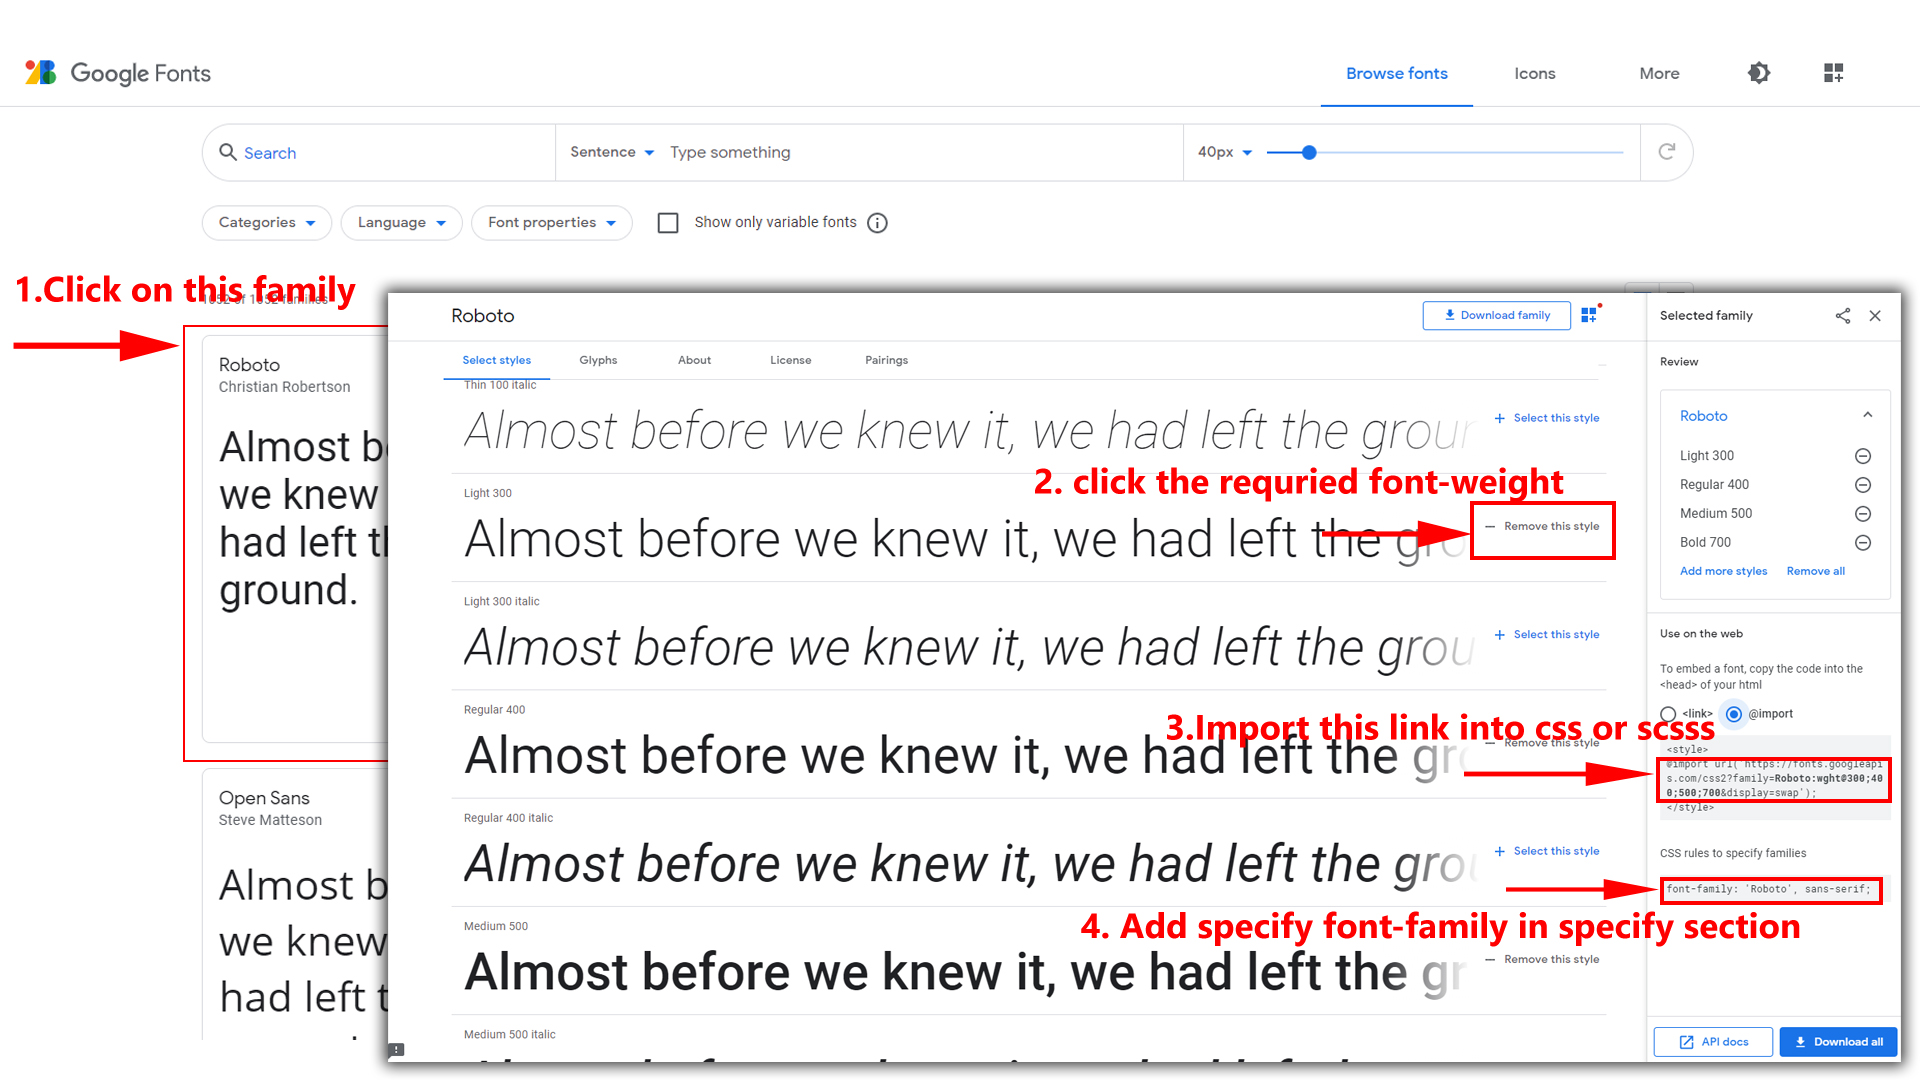
if you want to change another font-family Go to the site Google Fonts And Select One font Family and import in to styles.scss file
How to Select font Family
Example:
Step 2:
And paste Your Selected font-family in style.scss
Example:

Step 3:
And add the Your Selected font-family in _customs.scss(src/assets/scss/custom/_customs.scss)
Example:
			body {
			font-size: 1rem;
			font-family: "Roboto", sans-serif;
			font-weight: 400;
			color: #{$color};
			background-color: #{$background};
			line-height: 1.5;
			text-align: start;
			overflow-x: clip;
			padding: 0;
			margin: 0;
			}
How to change Menu icons ?
The default icons used are from Remix Icon. ,To make changes in the current icon style, follow the steps below:
Go to the sidebardata.jsx component path: src\layouts\sidebar\sidebardata.jsx in the root folder.
Replace the existing icon with a new icon to change the menu icons in the sidebar.
How to Change Logo ?
For changing the logo in your template follow the below step to make the necessary changes.
step: 1
go to sidebar.jsx and change the images in the following path as mentioned belowHow to Enable RTL Version
How to Enable RTL Version?
Please follow the below steps to enable RTL Version
To enable RTL Version you have to
Open the switcherdata.jsx file located at src/layouts/switcher/switcherdata.jsx. and paste the code as shown below:
			//*RTL*//
					//RTL add class
			document.querySelector('body').classList.add('rtl');
						// RTL remove class
			document.querySelector('body').classList.remove('ltr');
Dark Theme Style
How to Enable Dark Theme?
Please follow the below steps to enable Dark Theme
To enable Dark Theme you have to Open the switcherdata.jsx file located at src/layouts/switcher/switcherdata.jsx. and paste the code as shown below:
			//Dark Theme Style
			//---- Dark mode adding Class ----- //
			document.querySelector('body').classList.add('dark-mode');
			//---- Dark mode remove Class ----- //
			document.querySelector('body').classList.remove('light-mode');
			document.querySelector('body').classList.remove('light-menu');
			document.querySelector('body').classList.remove('color-menu');
			document.querySelector('body').classList.remove('dark-menu');
			document.querySelector('body').classList.remove('light-header');
			document.querySelector('body').classList.remove('color-header');
			document.querySelector('body').classList.remove('dark-header');
Header Styles
How to Enable Color Header?
Please follow the below steps to enable Color Header
To enable Color Header you have to Open the switcherdata.jsx file located at src/layouts/switcher/switcherdata.jsx. and paste the code as shown below:
/*Color Header Styles adding class*/
document.querySelector('body').classList.add('color-header');
/*Color Header Styles remove class*/
  document.querySelector('body').classList.remove('light-header');
  document.querySelector('body').classList.remove('dark-header');
How to Enable Dark Header?
Please follow the below steps to enable Dark Header
To enable Dark Header you have to Open the switcherdata.jsx file located at src/layouts/switcher/switcherdata.jsx. and paste the code as shown below:
/*Dark Header Styles adding class*/
   document.querySelector('body').classList.add('dark-header');
/*Dark Header Styles remove class*/
   document.querySelector('body').classList.remove('light-header');
   document.querySelector('body').classList.remove('color-header');
Theme Primary Color
How to Enable Primary Color?
To enable the Primary Color, please follow the steps below:
Step 1:
Open the switcherdata.jsx file located at src/layouts/switcher/switcherdata.jsx. and paste the code as shown below:
export const ThemePrimaryColor = () => {
	const [state, updateState] = useState("#0162e8");

	const handleInput = (e) => {
	let { r, g, b } = hexToRgb(e.target.value);
	updateState(e.target.value);
	const rgbaValue = `rgba(${r}, ${g}, ${b}, 1)`;
	const rgbaValue005 = `rgba(${r}, ${g}, ${b}, 0.05)`;
	const rgbaValue1 = `rgba(${r}, ${g}, ${b}, 0.1)`;
	const rgbaValue2 = `rgba(${r}, ${g}, ${b}, 0.2)`;
	const rgbaValue3 = `rgba(${r}, ${g}, ${b}, 0.3)`;
	const rgbaValue4 = `rgba(${r}, ${g}, ${b}, 0.4)`;
	const rgbaValue5 = `rgba(${r}, ${g}, ${b}, 0.5)`;
	const rgbaValue6 = `rgba(${r}, ${g}, ${b}, 0.6)`;
	const rgbaValue7 = `rgba(${r}, ${g}, ${b}, 0.7)`;
	const rgbaValue8 = `rgba(${r}, ${g}, ${b}, 0.8)`;
	const rgbaValue9 = `rgba(${r}, ${g}, ${b}, 0.9)`;
	const rgbaValue10 = `rgba(${r}, ${g}, ${b}, 0.58)`;
	const rgbaValue11 = `rgba(${r}, ${g}, ${b}, 1)`;

	document.documentElement.style.setProperty("--primary01", rgbaValue1);
	document.documentElement.style.setProperty("--primary02", rgbaValue2);
	document.documentElement.style.setProperty("--primary03", rgbaValue3);
	document.documentElement.style.setProperty("--primary04", rgbaValue4);
	document.documentElement.style.setProperty("--primary05", rgbaValue5);
	document.documentElement.style.setProperty("--primary06", rgbaValue6);
	document.documentElement.style.setProperty("--primary07", rgbaValue7);
	document.documentElement.style.setProperty("--primary08", rgbaValue8);
	document.documentElement.style.setProperty("--primary09", rgbaValue9);
	document.documentElement.style.setProperty("--primary005", rgbaValue005);
	document.documentElement.style.setProperty("--primary-bg-color", rgbaValue);
	document.documentElement.style.setProperty("--primary-bg-hover", rgbaValue10);
	document.documentElement.style.setProperty("--primary-bg-border", rgbaValue11);

  };

return (
			<div className="ThemePrimaryColor">
				<ColorPicker onChange={handleInput} value={state} />
				<div className="my-bootstrap-component" style={{ backgroundColor: 'var rgba(--primary-color)' }} >
				</div>
			</div>
			);
			};
Step: 2
Open the Switcher.jsx file located at src/layouts/switcher/switcher.jsx.and paste the code as shown below:
import * as switcherdata from '../../layouts/switcher/switcherdata'

<switcherdata.ThemePrimaryColor />
How to Enable Background Color?
To enable the Backgroundcolor Color, please follow the steps below:
Step 1:
Open the switcherdata.jsx file located at src/layouts/switcher/switcherdata.jsx. and paste the code as shown below:
export const Backgroundcolor = () => {
	const [state, updateState] = useState("#373c56");

		const handleInput = (e) => {
	let { r, g, b } = hexToRgb(e.target.value);
	updateState(e.target.value);
	const rgbaValue = `rgba(${r}, ${g}, ${b})`;
	const rgbaValue005 = `rgba(${r}, ${g}, ${b}, 0.05)`;
	const rgbaValue1 = `rgba(${r}, ${g}, ${b}, 0.1)`;
	const rgbaValue2 = `rgba(${r}, ${g}, ${b}, 0.2)`;
	const rgbaValue3 = `rgba(${r}, ${g}, ${b}, 0.3)`;
	const rgbaValue4 = `rgba(${r}, ${g}, ${b}, 0.4)`;
	const rgbaValue5 = `rgba(${r}, ${g}, ${b}, 0.5)`;
	const rgbaValue6 = `rgba(${r}, ${g}, ${b}, 0.6)`;
	const rgbaValue7 = `rgba(${r}, ${g}, ${b}, 0.7)`;
	const rgbaValue8 = `rgba(${r}, ${g}, ${b}, 0.8)`;
	const rgbaValue9 = `rgba(${r}, ${g}, ${b}, 0.9)`;
	const rgbaValue10 = `rgba(${r}, ${g}, ${b}, 0.87)`;

	document.documentElement.style.setProperty("--primary01", rgbaValue1);
	document.documentElement.style.setProperty("--primary02", rgbaValue2);
	document.documentElement.style.setProperty("--primary03", rgbaValue3);
	document.documentElement.style.setProperty("--primary04", rgbaValue4);
	document.documentElement.style.setProperty("--primary05", rgbaValue5);
	document.documentElement.style.setProperty("--primary06", rgbaValue6);
	document.documentElement.style.setProperty("--primary07", rgbaValue7);
	document.documentElement.style.setProperty("--primary08", rgbaValue8);
	document.documentElement.style.setProperty("--primary09", rgbaValue9);
	document.documentElement.style.setProperty("--primary005", rgbaValue005);
	document.documentElement.style.setProperty("--dark-body", rgbaValue10);
	document.documentElement.style.setProperty("--dark-theme", rgbaValue);

	document.querySelector('body').classList.add('dark-mode');
	document.querySelector('body').classList.remove('light-mode');
	document.querySelector('body').classList.remove('light-menu');
	document.querySelector('body').classList.remove('color-menu');
	document.querySelector('body').classList.remove('dark-menu');
	document.querySelector('body').classList.remove('light-header');
	document.querySelector('body').classList.remove('color-header');
	document.querySelector('body').classList.remove('dark-header');

 };
		return (
				<div className="ThemePrimaryColor">
					<ColorPicker onChange={handleInput} value={state} />
						<div className="my-bootstrap-component" style={{ backgroundColor: 'var rgba(--primary-color)' }}>
						</div>
						</div>
			);
		};
Step: 2
Open the Switcher.jsx file located at src/layouts/switcher/switcher.jsx.and paste the code as shown below:
		import * as switcherdata from '../../layouts/switcher/switcherdata'

		<switcherdata.Backgroundcolor />
How to Enable Boxed Version
How to Enable Boxed Version?
Please follow the below steps to enable Boxed Version
To enable Boxed Version you have to Open the switcherdata.jsx file located at src/layouts/switcher/switcherdata.jsx. and paste the code as shown below:
			//Boxed styles
				/*Boxed-Layout Styles adding class*/
			document.querySelector('body').classList.add('layout-boxed');
				/*Boxed-Layout Styles remove class*/
			document.querySelector('body').classList.remove('layout-fullwidth')
How to Enable Scrollable Style
How to Enable Scrollable Style?
Please follow the below steps to enable Scrollable Style
To enable Scrollable Style you have to Open the switcherdata.jsx file located at src/layouts/switcher/switcherdata.jsx. and paste the code as shown below:
//Scrollable styles
  		/*Scrollable-Layout Styles adding class*/
  		document.querySelector('body').classList.add('scrollable-layout');
  		/*Scrollable-Layout Styles remove class*/
  		document.querySelector('body').classList.remove('fixed-layout');
Others
How to remove the switcher
Please follow the below steps to remove Switcher
Step: 1
Open the Header.jsx file located at src/layouts/header/header.jsx. In this file, you can either remove or comment out the switcher code as shown below:
{/* Switcher Open */}

<className="demo-icon nav-link icon" onClick={()=>SwitcherIcon()}>

<<i className="fe fe-settings fa-spin text_primary"></i>
</code>

{/* Switcher Close */}
Step: 2
In the same Header.jsx file, you need to remove or comment out the switcherMenu function code as shown below:
const SwitcherIcon = () => {
			document.querySelector(".demo_changer").classList.toggle("active");
			document.querySelector(".demo_changer").style.right = "0px";
}
Step: 3
Open the app.jsx file located at src/layouts/app.jsx. Remove or comment out the Switcher component tag, as well as the corresponding import statement, as shown below:
import Switcher from './../layouts/switcher/switcher';

<Switcher />
Step: 4
Lastly, remove the switcher page layout file Switcherpage.jsx located at src/layouts/ and also remove the switcher page layout from the header2.jsx file in the header folder (if applicable) at src/layouts/header/header2.jsx.
Additionally, remove the switcher page route from the routing file (main.jsx). Remove or comment out the line as shown below:
	<Route path={`${import.meta.env.BASE_URL}`} element={<Switcherpage />}>
	<Route path={`${import.meta.env.BASE_URL}pages/switcherpage`} element={<Customswitcher />} />
	</Route>
How to remove the Loader
Please follow the below steps to remove Loader
To remove Loader you have to open main.jsx
(src/main.jsx)
file and remove or comments for Loader code as shown in below
"const App = lazy(() =>"
<if you want to change a custom loader image please follow the below steps below
Step: 1
for changing a custom image you have to open Loader.jsx
(src/layouts/loader/loader.jsx)
file and remove the existing image path and you can put the new image as shown in below
<